Today we present you some DIY decor ideas for the walls of the house that you can take advantage of to give it an autumn air. In many articles we have shown you decoration ideas for the fall and since we are in September. The first idea that we show you is a paper chain with which you can decorate your wall. It can be made to decorate a birthday party, baby shower, or just for fun. The best of all is that it is so easy to do and super original as it attracts attention. Also you can do it with children.
DIY decor for the wall in autumn

Materials: Colored paper in orange, light pink, light blue, blue, green, dark orange; Paper cutter; Glue gun; Wooden stick; Better to find paper with the same thickness and weight.

Fold the first piece of paper and glue the ends forming a circle with the glue, do not forget to follow the pattern. Keep overlapping each piece of paper and securing it with glue. Move on to the next color and secure with glue. Continue until you have completed one garland and start the next one. Slide the threads onto a wooden pole and hang on the wall.

DIY decor for cardboard walls

Hello autumn! Autumn is about to begin and you can decorate the wall with some flowers in typical autumn colors, it is so ready for it! This oversized floral wall greeting art is the perfect way to decorate for the season. The key to making this great floral poster is buying lots of flowers. Buy more than you think you need because you will probably need them! For this project you need.
Diy decor for the fake flower walls

Thick cardstock; Pen penci;l Pair of scissors; Variety of false flowers; Wire cutters; Glue gun.

DIY decor for the walls

Draw your word in italics on the poster board as large as possible (using two pieces if necessary). Don’t worry about the lines you can make mistakes! They will be covered. Use scissors or a craft knife on a safe surface to cut out the word. Cut the flowers off the stems with a set of wire cutters.

You will need many and a variety of sizes. Heat the glue gun and start gluing the flowers onto the cardstock. Spread out the largest blooms first and fill with medium and small blooms, alternating colors until full. Don’t forget to be careful and keep the letter spacing so you can still read them.

If you like the boho style, here we present you a DIY wall decor that is a little more boho than you might be used to, but it’s still colorful and fun. Definitely very simple to do and even more so if you know how to use a glue gun.

Diy decor for the walls in the boho style

Macrame ornaments and tassel from the store. Picture frames. Fast drying hot glue gun or tacky glue, and finally scissors.

Start by gluing the cutout around the edge of the frames. For the corners, simply fold at an angle, glue down, and move to the next side of the frame. Once you’ve gone through the picture frame, cut off the excess trim and glue the end. For the short cutout, simply leave the front of the picture frame decorated with the cutout. For the longer cut, you can either leave it as is, or fold the edge around the frame and glue it to the back of the frame for a macrame-covered frame look, while letting the tassels hang.

These pictures for the fall are perfect to decorate the wall. And to make sure the mrco stands out, I added simple artwork of color in a colorful fall palette. The natural look of undyed macrame is very attractive, but if you want even more color with your texture, you can use fabric dye to dye before gluing to get a more autumnal look.
DIY decor for the walls

Fall crafts are not always a very difficult thing to do. Although decorating is not her thing, she is trying her best to find some cute ideas for fall this year. We present you another idea that is done in a few minutes of a garland of large pompoms. You need some pompoms, a wood and yarn scoop and that’s it.

Diy decor for the pompom walls

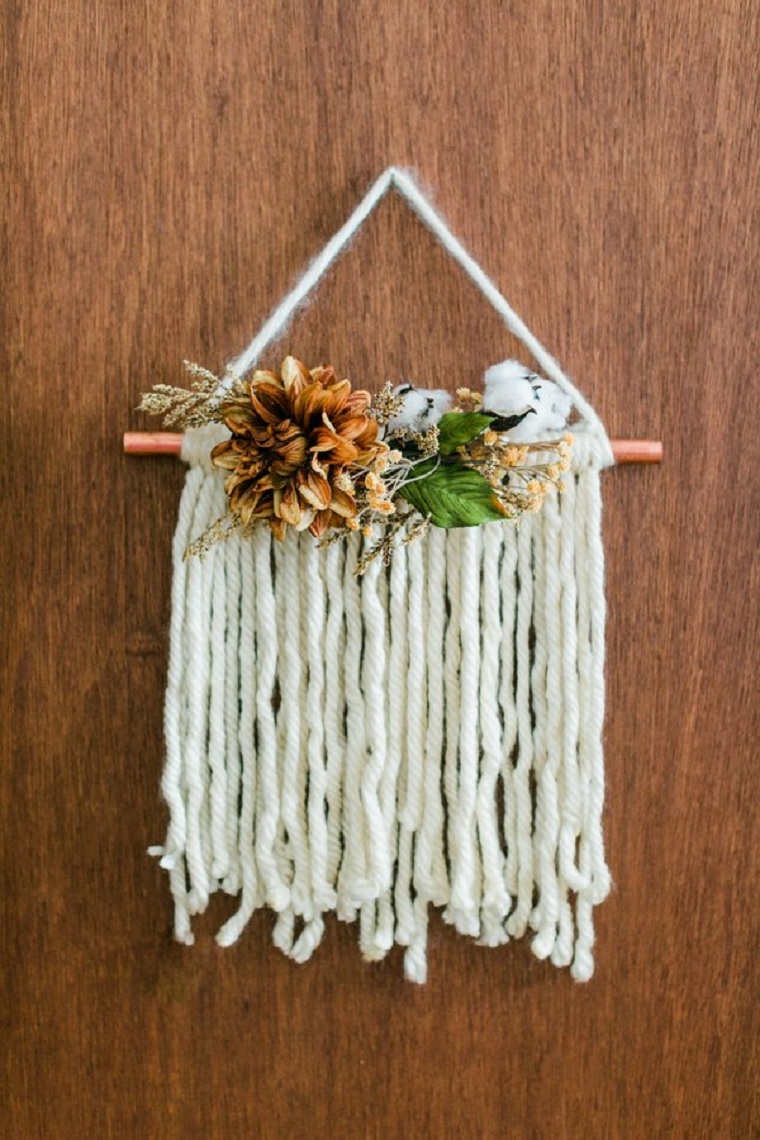
This fall, hang a decoration made with copper wire and pipe.
Although we have shown you many ideas on how to make an autumn wreath, today we ask you why not try to change it for this sweet and simple decoration? This project is easy to do and a great last minute decorating idea.
Things you will need
Copper tubing, string in your choice of color and texture, scissors, fake dried flowers and branches, wire cutters, heavy duty transparent tape, gold floral wire, hammer. Cut the copper tubing to size with a pipe cutter if yours is very large. Keep in mind that the decoration for your wall will have more stability and will stay in place more easily if it is a little smaller.

Cut the yarn into individual lengths. Depending on the type of yarn you use, you will need between 25 and 35 pieces of cut yarn. Connect the pieces of wire to the copper tubing with a standard knot. Tie a triple knot with an extra piece of string cut on each side of the copper tubing you will use to hang the piece on the wall later. Cut off the fake flower buds and dry branches with pliers.

Create an arrangement so that the flowers cover the bare stems as much as possible, and tape them all together with sturdy clear tape. Wrap the floral wire around the faux arrangement leaving plenty of excess wire hanging down. Then, to securely attach the arrangement to the pipe, wrap the excess wire around the copper pipe between the thread knots. Hang your finished design on a wall with a nail or removable hook. This decoration can be used year after year.

Next project we are going to share this DIY personalized monogram wreath with you today. It is a very simple craft to do and easily customizable for any season. As we welcome autumn, we invite you to decorate your wreath with leaves and some flowers.

2 mm thick wire; Brown thread Twigs: of course you can always buy some if you don’t want to pick them up on your own; Small pumpkins: you can also use some foam flasks like these; Artificial leaves and flowers; Glue gun; Pruning shears; Pair of scissors; Pliers.

The first thing to do is create your monogram shape with the wire. I wanted the structure to be strong enough to support the weight of the twigs, so I cut 2 pieces of wire 1m each and, using pliers, wrap them around themselves. Then I bent the wire to create the shape you want. Don’t be too concerned if the wire is not perfectly flat or wrapped, because it will be covered with twigs. Cover the wire with twigs. As you’ve probably guessed, some letters are easier to make than others.

If you want to make a rounded letter, try to find more flexible twigs, the ones that were cut recently will work better. Also try to imagine your monogram shape when choosing your twigs. Place the twigs on the wire and tie them together with the brown string. Just wrap the twine around the twigs and wire, and double knot to hold everything together. Attach the branches as you go, evenly distributing them to create your monogram. Feel free to add several layers of twigs to give your letter rigidity.

Then add fall decorations to your wreath such as mini pumpkins, leaves, and flowers. Since the little pumpkins are a bit heavy, tie them to the wreath with a thin wire. I drilled two holes on either side of the pumpkins and ran the wire through them. Then wrap the ends of the wire around the crown.

Use your glue gun to add lightweight decorations, flowers, and leaves to your monogram wreath. If you are working with plastic pumpkins, which are lightweight, you can also glue them directly to the wreath.

DIY Slice Wood Pumpkin
Chalkboard Wood decorations add the perfect rustic touch to the house and even more so during the fall. See how to give a piece of wood two different looks, including a chalkboard and a pumpkin with just one piece of wood.
A piece of wood with a round shape; Orange paint; Black chalkboard paint; Medium brush; Fine grit sandpaper; Clean dry cloth; Small stem; Burlap ribbon or twine; Artificial green foliage; Hot glue gun with clear craft glue.

Paint one part orange leaving the outside of the wood exposed between the bark and the paint line. Continue from side to side of wood cutting, leaving some very lightly painted, or even unpainted, sections for a really weathered rustic look. Let dry completely (at least one hour). Lightly sand the sections of the “pumpkin” part to accentuate the parts you painted.

Flip the wood over.Again, paint over the cut wood surface, leaving an exposed edge around it. Paint the first layer with vertical strokes and then a second layer with horizontal strokes. Let dry completely. Glue a piece of curly ribbon to the top of the wood slice with the hot glue gun. Glue the stem to the top of the ribbon. Add several leaves hanging over one side of the wood slice pumpkin and then flip over and glue a few to the other side.

With just a few supplies, you can make this mini garland for a fun and playful decoration. Buy some small bells of the color you like, you can buy orange bells in any craft store. What you need are bells, green string or string, green construction paper, hot glue gun, scissors.

Draw a sheet on construction paper to use as a guide to cut out the rest. When all the leaves are cut, it’s time to put everything together. Add your gourds (bells) to the string and tie the knots at each end. Use the hot glue gun to start gluing the leaves between the pumpkins. I asked Scout where we should hang this and she wanted it on our “art board” in the kitchen.